Friday, December 31, 2010

Before and After: Octagonal Mirror

I made a trip to Goodwill the other day to donate some old clothes and a vast array of old VHS movies.  It was hard to part with those - I've had them for years and some of those movies I haven't seen in years.  But seeing as how I don't even own a VHS player anymore, I finally forced myself to part with them.  I digress.

So, after I dropped off my donations, I decided to take a spin through the store.  I'm so glad I did!

One thing I bought was this mirror:


It is made out of a funky material that I can't quite figure out what it is.  It feels very 1960's or 70's but I can't put my finger on it.  Does that make sense what I mean about feeling like the 60's?  Or maybe it was just the horrible gaudy dirty bronze that it was.  Regardless, I was a fan of the shape and of the detail of the frame:


For $7.99 I figured it was a must have.

So, I started by priming it.  


My natural inclination would be to leave it white but I decided to go a little out of my comfort zone to spice things up a bit.  High gloss red!  Can't get enough of that high gloss paint effect lately.  I'm pleased with how it turned out.


I've put it in my guest room for now but am considering selling it.  It would look awesome in an entry way over a console - our house is just too small!


I got this cute plant at Home Depot the other day for two bucks.  I had a little terracotta pot and used up the rest of my high gloss red paint to spice the spot up a bit.  I love the little splash of color and the bright green of the plant.


Thursday, December 30, 2010

Yarn Wreath with Felt Flowers


Remember how a few days ago I was lamenting about the fact that Christmas was over?  One of the things I had most about the holidays ending are taking the decorations down.  I love having a wreath on the front door.  So, instead of going back to bare and boring, I decided to spice things up with a do it yourself yarn wreath.  I've read about people making them and goodness knows I have enough spare yarn around the house with all my knitting.  So, after a quick trip to Michael's for the wreath formation and some felt, I was ready to begin.  It is so, so easy and I love the end result.  You can do one for all different holidays just by changing up the colors and things you adorn it with. 

I got my inspiration from Danielle over at Take Heart.  She's got a great blog and tutorial if mine isn't specific enough.  I did a few things a little differently but the end result is similar.  Here's hers:


And here's how I did mine. 

I started with a round foam wreath ring and one skein of cream yarn.


I found that cutting the yarn every yard or two was much easier than wrapping the entire skein around.  I went around one layer as evenly as I could and then wrapped a second layer to cover in the holes.  I really see no point in trying to get it to line up evenly - you'd make yourself crazy and I don't think that the end result would necessarily be any cuter.  I tied each piece of yarn on and then tied it off at the end. 

The front ended up looking like this:


And the back looks like this:


Then comes the fun part which is making the felt flowers.  I used several different bright colors.  First, cut out a squiggly circle - it does NOT need to be perfect.


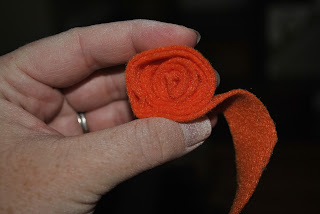
Then begin to cut the larger circle into a spiral around and around.  Make sure you don't make the spiral sections too thin or your flower won't hold up.


You'll end up with one long piece of felt like this:


Begin to wrap the felt around and around so it forms the shape of a flower.  (Please ignore the white spray paint all over my fingers - I was working on a different project on the same day as this).


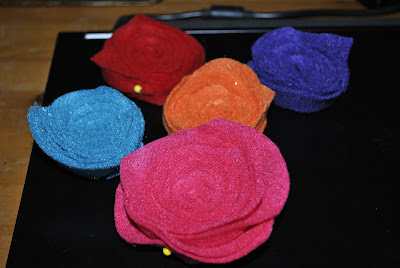
Danielle glued hers but I had a stack of pins sitting by and found this worked well because it went all the way through the layers holding it together firmly.  Plus, I liked the little bit of contrasting color showing. 


Each flower will be unique but here is any idea of what a finished piece could look like:


Make the desired number of flowers you want for your wreath.


I glued them to the wreath using tacky glue and added a couple of dark green leaves as well.  Here is the finished product.  It is probably better suited to indoors but our front porch is covered so I'm going to give it a whirl outside after I take my Christmas wreath down after New Year's. 


Wednesday, December 29, 2010

IOMOI GOODNESS!

My friend Amanda is one of the most stylish people I know - I think I may have mentioned that before.  Anyway, on top of her great sense of style, she is one of the best gift givers I've ever known.  I aspire to be like her.  She gives thoughtful and original gifts that are useful and cute to boot.  After I wrote about Gadabout the other day, I sent her the link because I knew it would be up her alley.  And of course, she had another great site to share with me - Iomoi.  And I am obsessed.  Just look at some of their stationary, cards and invites:


Gift Tags:

And coasters - what a cute gift!!


Shop Iomoi yourself.

Bourbon Street Pork


My brother's sweet girlfriend, Sarah, gave me a cookbook for Christmas filled with recipes from Raleigh's Junior League.  I decided to try one out and it was fabulous so I thought I'd share it with you.  The recipe actually called for pork tenderloin but I had a pork butt on hand so I used that and it worked great as well. 

Bourbon Street Pork Marinade
1/4 cup peanut oil (I used sesame because that is what I had on hand and really liked it)
1/2 cup soy sauce
1 teaspoon worcheschire sauce
3 cloves chopped garlic
1/4 cup bourbon
1/4 cup dijon mustard
1/4 cup brown sugar
2 teaspoons grated fresh ginger

Marinate for at least two hours - the longer the better! 

You can broil it in the oven or put it on the grill.  We grilled ours and the marinade made this awesome crust on the outside.


Tuesday, December 28, 2010

Decorati Design Tool

If you are an aspiring designer or simply enjoy playing around with arranging furniture, fabrics, accessories, etc. then head over to Decorati.  Decorati paired up with Polyvore to create an online room decorating tool with their products.  Polyvore was originally designed to do fashion design - something I clearly don't know much about.  But this decorating tool?  I could spend hours!    Here was my first room attempt:


Do you like the dog I threw in?  The interesting thing about this tool is working with a blank slate.  You don't have to use any of your existing furniture so it really allows for creativity.  This room looks nothing like my house nor am I sure that this is the direction I would go towards in real life but it was fun designing it.

Fabricadabra

Pretty little pillows in all kinds of prints.  How to choose?


See all the options on the Fabricadabra site.
Related Posts Plugin for WordPress, Blogger...